
This blog features items received from Island Batik, Hobbs Batting, Schmetz Needles and Studio Design 180 as part of the 2023 Island Batik Ambassador program. This blog’s fabric features are Kings Castle Fleur-Neutral Pearl yardage, Precious Pink pre-cuts collection and Island Batik Lace.
Looking for a fun fabric giveaway? Want to know more about puff quilts? Be sure to check out the February 2023 Island Batik All Puffed Up Blog Hop! Check the Island Batik blog each Friday during the February 2023 Blog Hop for a chance to win beautiful Island Batik fabric! A new giveaway each week! Many of the Island Batik 2023 Ambassadors will also have their own giveaways on their Puff Quilt blogs!
Readers who like and comment on this Love Letters Puffy Quilt blog in February 2023 will be entered into a raffle to receive a special Valentine–a half yard of beautiful Island Batik Sangria, shown below. The randomly selected winner will be announced on Pink Tulip Quilting’s IG account on March 1, 2023. Be watching in March for more work using the King’s Castle Collection by Island Batik!

Love Letters Puffy Quilt Design Concept
The Island Batik All Puffed Up Blog Hop was my first challenge as a 2023 Island Batik Ambassador. The challenge was to create a puffy quilt. Honestly, I am not a puffy quilt kind of girl. I had never made a puffy quilt but determined to create a unique piece. The essential element that swayed my design was the month we post– I had to go with a Valentine quilt; February is the month for Valentines!!!
The quilt I imagined would have a puffy central heart panel using the beautiful rose and pink batiks from the Precious Pink precut set available in fabric stores in February 2023 and provided by Island Batik. The Precious Pink set includes 42 10-inch batik squares with 20 different fabric designs.

My initial idea was to have a central heart surrounded by a dreamy neutral from the King’s Castle Collection, the lovely Fleur-Neutral Pearl. This beautiful fabric and the fabric chosen for the back of the quilt; the lovely Island Batik Lace, look like love letter writing parchment paper.

My goal of minimal scraps required design choices and the idea to surround the central heart panel with puffy side panels required some thought and research!!!!

One design element for the perimeter panels, I wanted to include was prairie points. I have a thing for prairie points, I have added prairie points on the perimeter of at least 10 quilt projects-including my youngest grandchild’s jungle quilt in the picture shown below. The Jungle Quilt featured alternating sizes of prairie points. Prairie Points are a fun, traditional addition to a quilt plus they provide color and interest!

For some prairie point inspiration, I scrolled through Pinterest and came across prairie points used within a quilt; not only around the perimeter at https://www.pinterest.com/pin/146930006578324323/. Where had I been!! The wheels started turning and a decision made!
Of course, Pinterest supplied even more inspiration. I came across a great diagram, a Pixilated Heart for my center heart panel and a nice puff quilt inspiration with a side panel, https://www.pinterest.com/pin/146930006584116167/. The Pixilated Heart diagram was a perfect grid layout for the puff quilt I had imagined!

Heart Grid Construction
Before starting to sew, I changed out my Brother Dreamweaver’s well used Schmetz needle for a new Schmetz quilting needle, size 130/70. The SCHMETZ Quilting sewing machine needle is specifically designed for piecing and quilting with a special taper to the slightly rounded point, the needle easily penetrates fabric and helps eliminate skipped stitches.
Each 10-inch square from the Island Batik Precious Pinks precut pack would accommodate two 4-inch cuts with a two-inch length left over or one 4-inch cut and two 3-inch cuts. Those combos left me with almost zero scraps. The two-inch lengths would be used for my prairie point design, the 3-inch lengths would be the prairie points and the 4-inch for the heart section of the Pixilated grid. I went to work cutting and used all but four 10-inch squares that I saved for later. I had used thirty-eight 10-inch precut squares of the Island Batik’s Precious Pink precuts and the colors were luscious!
I did not want to make the puff squares too large or too small. The customary method to make a puff quilt included puffs or biscuits consisting of a larger square to be pintucked and sewed to a smaller bottom square. The smaller square can be .5 to 1 inch smaller than the top square. The Love Letters Quilt initial plan was for a .5-inch difference between the top and bottom layers hoping for less puffiness. Turns out, I did not use the 70 muslin 3.5-inch squares I had cut for the back of the biscuits nor did I make individual biscuits. Tedious process has always stimulated the process improvement manager in me.

I trialed sewing a few 4-inch squares to the 3.5-inch muslin backing and it was not working- it was tedious and looked sloppy! I went ahead and sewed the pixilated heart in three panels to make it easier to manage. Then I sewed Hobbs batting to the back of each panel. The batting used for each panel were left over batting pieces from previous projects–good thing I have a consistent habit of using Hobbs Heirloom® Premium 80/20 Cotton Blend.
Hobbs Heirloom® Premium Cotton Blend is made from 80% long staple cotton fibers and 20% fine polyester. This combination of fibers creates a strong, longwearing batt and is very easy to handle. The batting is lightly needle punched and treated with a soft resin to provide stability to the fibers and prevent the polyester from bearding. This process makes Hobbs Heirloom® Cotton Blend Batting uniquely easy to quilt by hand and withstand the manipulation of processing a puff quilt.

Love Letter Envelope Construction
I started the Love Letter envelope construction by double folding the 3-inch Precious Pink squares for the prairie points To make a prairie point, take a square of fabric and fold diagonally twice. The Magic Wand was handy to press the prairie points as I folded–quick and easy to swipe the Magic Wand along the edges to cleanly dry press. The Magic Wand from Studio 180 Design, Ltd. and the Studio 180 Tucker Trimmer were so easy to use.
Once I had approximately 50 prairie points, I trimmed up the leftover 2-inch lengths. I had an equal number of Island Batik King’s Castle Fleur Neutral Pearl and Precious Pinks 2-inch by 4-inch lengths. Each prairie point was clipped to a 2-inch by 4-inch rectangle and sewn. Another 2 by 4-inch rectangle was added to each. Then 4-inch squares of the Island Batik Precious Pinks left over from the heart grid. These design elements turned out so pretty!! They looked like the back of love letter envelopes. I suppose a flying geese construction could be substituted but I loved adding that flap of color to include a surprising interest to a quilt.

Puffing the Love Letters Quilt
The goal was for the heart to stand out from the simulated parchment background. Hobbs Heirloom® Premium 80/20 Cotton Blend was basted along three sides of each grid panel perimeter, leaving one length side open. This opening would serve as a pocket to fill the puffs. I sewed around the perimeter of the heart section of each panel keeping that open pocket side available. I filled each column of the heart grid section with polyfill, essentially creating a tube of puff. Then each puffed column was secured with a run of wavy stitches. Once each panel section of the grid was puffed, I sewed the panels together matching seams on all those grid squares. The stitching together of those puffed panels was slow going. I was careful, matching the seams and ensuring the correct layout was achieved. Remember the Island Batik King’s Castle Fleur Neutral Pearl squares were still not puffed yet; only the heart section was puffed in this experiment.
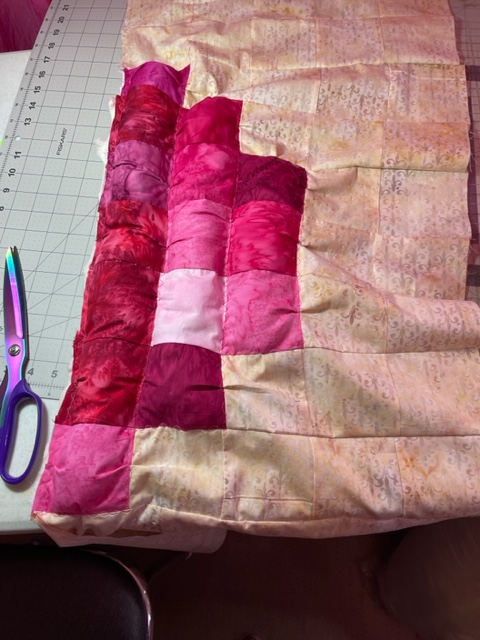
How was I going to puff the King’s Castle Collection Fleur Neutral-Pearl section of the heart grid? I did know I wanted the puffiness of that creamy section to be less than the heart section. Those Island Batik Precious Pinks were lovely together; they should be the star of the show! I opted for a controlled approach to puffing the remaining squares. In order to monitor the fill of each puff I determined to utilize the tedious process of filling each square with polyfill. So, after pin basting the entire rectangle to ensure the squareness of the project, I proceeded to wavy stitch the remaining squares ensuring every 4-inch square was secured to the batting. Then I cut a 2-inch slit in the batting behind each King’s Castle Collection Fleur Neutral-Pearl square being careful not to cut the top layer. I then filled each square with polyfill and hand basted closed the batting behind each square working in large sections. That controlled fill worked, and I was mindful not to over fill the perimeter squares as there would be a band of green sashing around the entire grid. The entire Pixilated Heart grid could have been completed in this way to complete the puff, sparing the challenge of sewing stuffed squares together but I like how the Island Batik Precious Pinks heart pops.
Finishing the Love Letters Quilt
The band of green sashing were four mossy green 2.5-inch strips from the Island Batik Glorius Greens precut strips pack. Once again there was minimal waste as I had only less than 2 inches left from each strip. Note I did add 2.5-inch squares of the Island Batiks’ King’s Castle Fleur Neutral Pearl to the four corners of the sashing rectangle. Now back to those prairie point Love Letters.

Each Love Letters Quilt envelope square measured 6.5 by 4 inches which meant I had a three-inch gap when using 14 love letter sections along each length of the quilt. Not perfection but I went ahead and added a three-inch spacer rectangle by 6.5 inch in the center between each 7-unit love letter section only on each length of the quilt. I decided that spacer rectangle was where a Love Letter stamp could reside! The Love Letter envelopes looked great when added around the perimeter!

At each corner I added four 3-inch by 4-inch Love Letter sections with a 1.5-inch by 6.5-inch sash between them. The Love Letters Quilt now measured 61 by 63 inches.
The Love Letters Quilt was sandwiched using a layer of Hobbs Heirloom® Premium 80/20 Cotton Blend and Lace,a neutral blend Island Batik for the back. To secure the quilt sandwich, I would hand tie around the heart in the center grid with the knotted ends tied on the back of the quilt using DMC cotton six-strand embroidery floss in reds and pinks. The steps to tie a quilt are:
- Step 1: Determine where you will tie your knots. (I went around the perimeter of the heart first then tied knots throughout the heart center spacing equally. This added some interest to the very plain quilt back.
- Step 2: Pick your needle: This blog by Mary Corbet is very helpful. I used a Size 13 Embroidery needle.
- Step 3: Thread your needle. I used all six strands for added strength–do not knot the ends.
- Step 4: Time to stitch! From the back of the quilt, pull the needle through the quilt and take a stitch, returning the needle to the back leaving a tail long enough to knot.
- Step 5: Make your knot and snip off the desired length. Fluff the strands a little.
- Step 6: Repeat the process from Step 3.
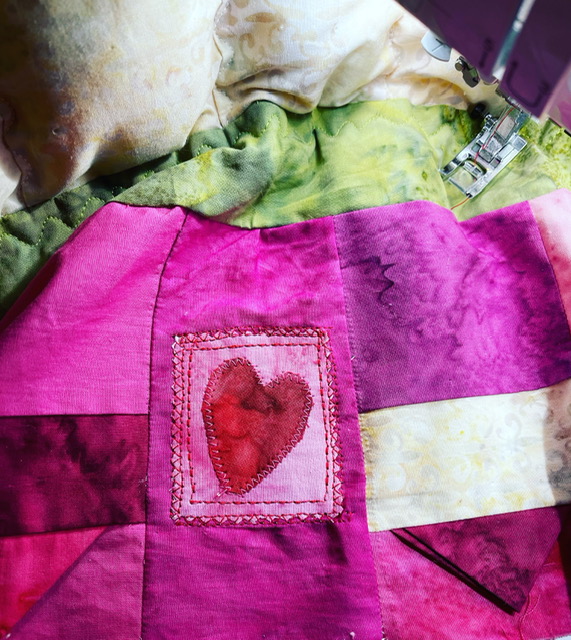
Once the heart was completely tied, I machine stitched along the green sashing then added a “stamp “applique to each length. To construct the stamp applique, I took a 2.5-inch square left over from the Precious Pink scraps added some stiff interfacing and trimmed with pinking shears. I cut out a heart in a contrasting Precious Pink color and zigzagged the raw edge heart applique unto the square stamp. To secure the stamp applique to the quilt, I first straight stitched along the perimeter of the applique then zigzagged around the perimeter.

The Love Letters Quilt corner sections were wavy stitched leaving one side open to add the puffiness. Either batting or polyfill can be used. Once each Love Letters Quilt corner section was puffed, the edge was sewed shut. Then the remaining sides were puffed and stitched closed.
A binding of Island Batiks’ King’s Castle Fleur Neutral Pearl was used to finish the Love Letters Quilt. One could choose any color for the sashing and binding; I happen to love pink and green together–such an earthy combination. The heart also does not have to be pink or red; any color or color combination can be substituted. The heart grid can be modified by changing the size of the squares within the grid; I may try 1.5-inch squares for a little puff quilt pillow.
The grid technique shortcut I created for filling the puffs by using the wavy stitch on the grid did away for the need to pin tuck each square individually and also did away with compiling individual biscuits to be sewn together both techniques seen in instruction videos online.
Now I have experimented and found the process that works best for me, I would do another puff quilt using that grid technique, it provided ample room to puff but did away with the tediousness!

My daughter, Holly Smith, wrote this poem as she watched the Love Letters Quilt come to life.
Patchwork Love Letters
I was going to buy you roses
but the thorns were just too sharp
and did not quite reflect the love
I have inside my heart.
I was going to buy you chocolates
and although a lovely smell
I did not think their presentation
Fulfilled all my love I could show
I thought I would write a letter
but it turned out rather long
Paper could not hold my love
And neither could a song
So I pieced my love together
A patchwork quilt of love letters
To keep you safe and warm
And shelter you in any storm.
@Copyright 2023

Such an amazing quilt! I can’t begin to imagine all of the research and work that went into it!
LikeLiked by 1 person
Great job I love it the idea is pretty cool ty for sharing
LikeLiked by 1 person
Great job I really love it ty for sharing
LikeLiked by 1 person
Thanks Anna🌷💕🌷
LikeLike
Beautiful quilt, prefect for Valentines Day.
LikeLiked by 1 person
🌷💕🌷
LikeLike
I like the way the heart stands out and I absolutely love the border. Thank you for your very detailed explanation on how you made it. And that poem is so sweet!
LikeLiked by 1 person
Awe, thanks so much!!
LikeLike
Your quilt is really gorgeous. I love your design and the way you went about making it. The border (Love Letter Envelopes) is amazing. I LOVE your quilt! Great job!
LikeLiked by 1 person
Thanks so much Joyce!
LikeLike
You certainly created a lovely quilt that looks like it is simply floating. Your daughter’s poem was a lovely tribute to your efforts!
LikeLiked by 1 person
Thank you Kathrie🌷
LikeLike
Sweet puffy quilt! Perfect for Valentine’s Day.
LikeLiked by 1 person
Thank you Jennifer 🌷
LikeLike
Your Love-ly quilt would make any special person feel appreciated and loved. Well presented.
LikeLiked by 1 person
Thank you Heather!
LikeLike
oh but your quilt is gorgeous. thanks for sharing and inspiring. please let your daughter know that her poem is fantastic.
LikeLiked by 1 person
Awe. Thank you Lori!!!
LikeLike
I was thinking that I loved your quilt for its name & theme, and then I arrived at the poem, and that won my heart even more! How completely charming, not to mention inventive. Thanks for taking so much time in sharing the details.
LikeLiked by 1 person
Thank you Beth!!🌷🌷🌷
LikeLike
Very creative quilt!
LikeLiked by 1 person
Thank you!
LikeLike
Your daughters poem – beautiful and so is the quilt!
LikeLiked by 1 person
Thank you Lee🌷🌷🌷
LikeLike
Amazing quilt and gorgeous poem to go with it!
LikeLiked by 1 person
Thank you Nikki!
LikeLike
I’m definitely impressed with how creative everyone has been with their versions of puff quilts. I love the heart!
LikeLiked by 1 person
Thank you Dawn!
LikeLike
This is “sew” pretty !!!
Love the heart and love letters
LikeLiked by 1 person
Thank you!!
LikeLike
Beautiful! I’ve never even thought about puffy quilts to be honest. They seems quite snuggly though so I might need to try one. I love the prairie points detail, it definitely gives it the extra pop.
LikeLiked by 1 person
Thanks Tanya! The Island Batik Ambassadors found various ways to make a puff quilt, so interesting!
LikeLike
I love the contrast between the orderly inner puffs and the border. Everything about this quilt is gorgeous!
LikeLiked by 1 person
Thank you Pam!
LikeLike
Your quilt is lovely, Renee. I love those Precious Pinks. And I really love your envelopes! Fun quilt!
LikeLiked by 1 person
Thank you Brenda!!
LikeLike